Home · Book Reports · 2023 · Godot 4 Game Development Projects - Build Five Cross-Platform 2D and 3D Games

- Author :: Chris Bradfield
- Publication Year :: 2023
- Read Date :: 2023-08-20
- Source :: Godot_4_Game_Development_Projects_-_Build_five_cross-platform_2D_and_3D_games_2ed_2023.pdf
designates my notes. / designates important. / designates very important.
Table of Contents
- 01: Introduction to Godot 4.0
- 02: Coin Dash - Build Your First 2D Game
- 03: Space Rocks - Build a 2D Arcade Classic with Physics
- 04: Jungle Jump - Running and Jumping in a 2D Platformer
- 05: 3D Minigolf - Dive into 3D by Building a Minigolf Course
- 06: Infinite Flyer
- 07: Next Steps and Additional Resources
· Chapter 01 - Introduction to Godot 4.0

· Chapter 02 - Coin Dash – Build Your First 2D Game
page 16:
-
Download the game assets from the following link below and unzip them into your new project folder: https://github.com/PacktPublishing/Godot-4-Game-Development-Projects-Second-Edition/tree/main/Downloads
-
You can also find the complete code for this chapter on GitHub at: https://github.com/PacktPublishing/Godot-4-Game-Development-Projects-Second-Edition/tree/main/Chapter02%20-%20Coin%20Dash
page 19:
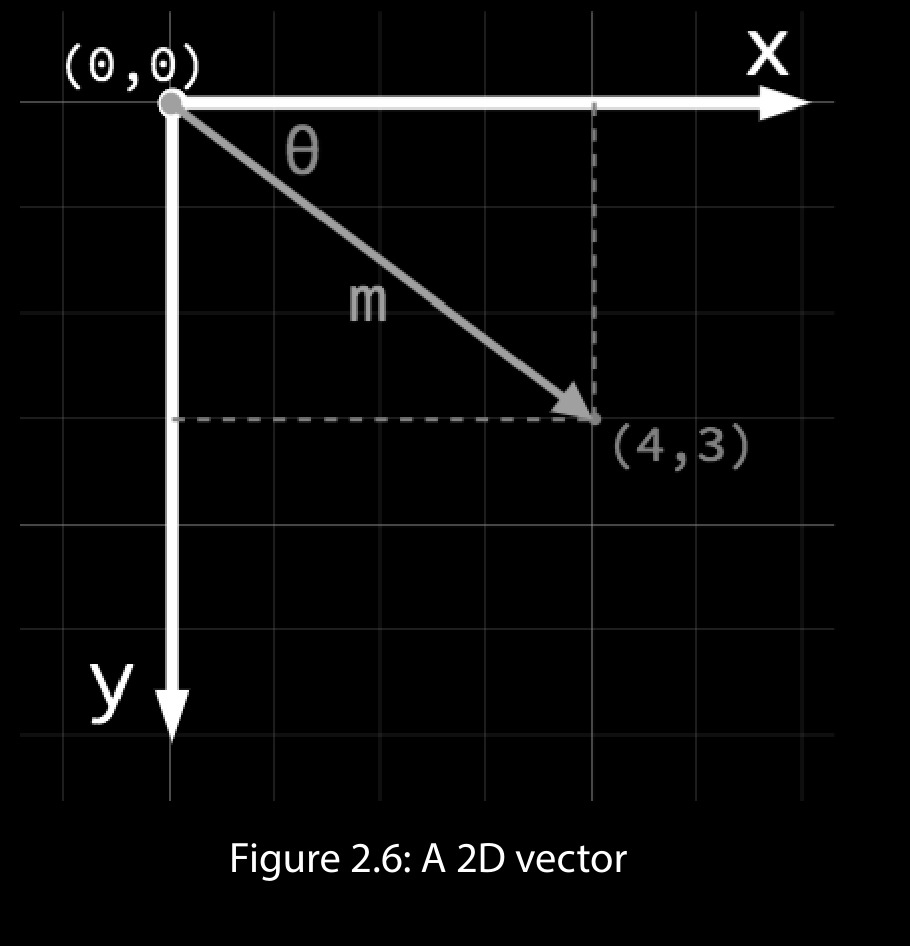
- In 2D space, Godot follows the common computer graphics practice of orienting the x axis to the right and the y axis downward:

- You can also think of the (4, 3) position as an offset from the (0, 0) point, or origin. Imagine an arrow pointing from the origin to the point:

page 20:
- This arrow is a vector. It represents a great deal of useful information, including the point’s location, its distance or length (m), and its angle from the x axis (θ). More specifically, this type of vector is referred to as a position vector – that is, one that describes a position in space. Vectors can also represent movement, acceleration, or any other quantity that has a size and a direction.
page 21:
- Whenever you save a scene in Godot, it will use the .tscn extension – this is the file format for Godot’s scenes. The “t” in the name stands for “text” because these are text files. Feel free to take a look at it in an external text editor if you’re curious, but you shouldn’t edit one by hand; otherwise, you run the risk of accidentally corrupting the file.
page 25:
- Using the @export annotation on the speed variable allows you to set its value in the Inspector window, just like any other node property. This can be very handy for values that you want to be able to adjust easily.
page 26:
- The
_process()function is called on every frame, so you can use it to update elements of your game that you expect to change often.
page 27:
-
The
_process()function includes a parameter called delta that is then multiplied by velocity. -
What is delta?
-
The game engine attempts to run at a constant 60 frames per second. However, this can change due to computer slowdowns, either in Godot or from other programs running on your computer at the same time. If the frame rate is not consistent, then it will affect the movement of objects in your game. For example, consider an object that you want to move at 10 pixels every frame. If everything runs smoothly, this will mean the object moves 600 pixels in one second. However, if some of those frames take a bit longer, then there may have been only 50 frames in that second, so the object only moved 500 pixels.
-
Godot, like many game engines and frameworks, solves this by passing you a value called delta, which is the elapsed time since the previous frame. Most of the time, this will be very close to 0.016 seconds (around 16 milliseconds). If you then take your desired speed of 600 px/second and multiply it by delta, you’ll get a movement of exactly 10 pixels. If, however, delta increased to 0.3 seconds, then the object would move 18 pixels. Overall, the movement speed remains consistent and independent of the frame rate.
-
As a side benefit, you can express your movement in units of pixels per second rather than pixels per frame, which is easier to visualize.
page 28:
-
Getting nodes
-
When using the $ notation, the node name is relative to the node running the script. For example, $Node1/Node2 would refer to a node (Node2) that is a child of Node1, which is itself a child of the node that runs the script. Godot’s autocomplete will suggest node names as you type. Note that if the name contains spaces, you must put quote marks around it – for example, $“My Node”.
see: [[Godot - Node Paths]]
· Chapter 03 - Space Rocks: Build a 2D Arcade Classic with Physics
page 50:
-
Download the game assets from the following link below and unzip them into your new project folder: https://github.com/PacktPublishing/Godot-4-Game-Development- Projects-Second-Edition/tree/main/Downloads
-
You can also find the complete code for this chapter on GitHub at: https://github.com/ PacktPublishing/Godot-4-Game-Development-Projects-Second-Edition/ tree/main/Chapter03%20-%20Space%20Rocks
page 51:
-
In game development, you often need to know when two objects in the game space intersect or come into contact. This is known as collision detection. When a collision is detected, you typically want something to happen. This is known as collision response.
-
Godot offers three kinds of physics bodies, grouped under the PhysicsBody2D node type:
-
StaticBody2D: A static body is one that is not moved by the physics engine. It participates in collision detection but does not move in response. This type of body is most often used for objects that are part of the environment or do not need to have any dynamic behavior, such as walls or the ground.
-
RigidBody2D: This is the physics body that provides simulated physics. This means that you don’t control a RigidBody2D physics body’s position directly. Instead, you apply forces to it (gravity, impulses, and so on) and Godot’s built-in physics engine calculates the resultant movement, including collisions, bouncing, rotating, and other effects.
-
CharacterBody2D: This body type provides collision detection but no physics. All movement must be implemented in code, and you must implement any collision response yourself. Kinematic bodies are most often used for player characters or other actors that require arcade-style physics rather than realistic simulation, or when you need more precise control over how the body moves.
page 55:
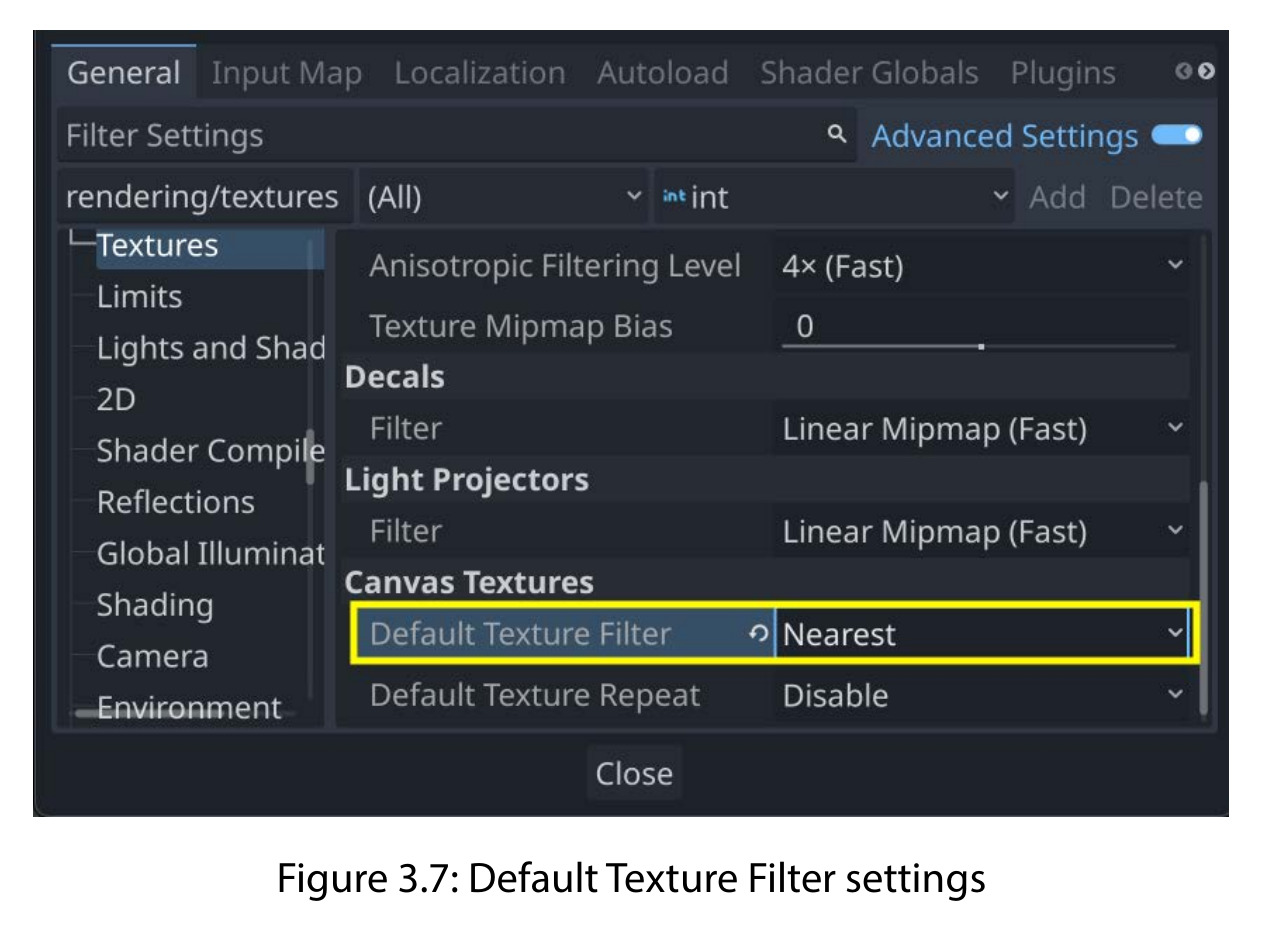
- The player ship is drawn in a pixel art style, but if you zoom in, you may notice it looks vary blurred and “smoothed out.” Godot’s default filter setting for drawing textures uses this smoothing technique, which looks good with some art, but typically isn’t wanted for pixel art. You can set the filtering individually on each sprite (in the CanvasItem section), or you can set it globally in Project Settings. Open Project Settings and check the Advanced Settings toggle, and then find the rendering/textures section. Near the bottom, you’ll see two settings for Canvas Textures. Set Default Texture Filter to Nearest.

page 60:
- A transform is a matrix representing one or more transformations in space, such as translation, rotation, and/or scaling. The translation (i.e., position) information is found by accessing the origin property of the Transform2D.
page 62:
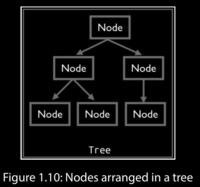
- In general, it is a bad idea to write code that assumes a fixed tree layout. Especially try to avoid situations where you use get_parent() if at all possible.
page 72:
- Godot’s Control nodes include a number of specialized containers. These nodes can be nested inside each other to create the exact layout you need. For example, a MarginContainer automatically adds padding around its contents, while HBoxContainer and VBoxContainer organize their contents in rows or columns, respectively.
page 76:
Connecting signals to preexisting functions.
- Select the HUD instance in Main and find its start_game signal in the Node tab. Click Connect, but in the popup, click the Pick button next to Receiver Method. You’ll see a list of the functions in Main, and you can select the new_game() function:

page 77:
- For the lives variable, you’ve added something called a setter. This means that whenever the value of lives changes, the set_lives() function will be called. This lets you automatically emit the signal as well as checking when it reaches 0.
page 84:
- The next step is to move along the path and remove the enemy when it reaches the end of the path:
func _physics_process(delta):
    rotation += deg_to_rad(rotation_speed) * delta
    follow.progress += speed * delta
    position = follow.global_position
    if follow.progress_ratio >= 1:
        queue_free()
- You can detect the end of the path when progress is greater than the total path length. However, it’s more straightforward to use progress_ratio, which varies from zero to one over the length of the path, so you don’t need to know how long each path is.
page 92:
Introduction to particle effects.
· Chapter 04 - Jungle Jump – Running and Jumping in a 2D Platformer
page 100:
-
A platformer requires gravity, collisions, jumping, and other physics behavior, so you might think that RigidBody2D would be the perfect choice to implement the character’s movement. In practice, you’ll find that the more realistic physics of the rigid body are not desirable for a platform character. To the player, realism is less important than responsive control and an action feel. So, as the developer, you want to have precise control over the character’s movements and collision response. For this reason, a kinematic style of physics is usually the better choice for a platform character.
-
The CharacterBody2D node is designed for implementing physics bodies that are to be controlled directly via code.
page 101:
- Sliding is a very common option for collision response. Imagine a player moving along a wall in a top-down game, or running along the ground in a platformer. While it’s possible to code the response yourself after using move_and_collide(), move_and_slide() provides a convenient way to implement sliding movement. When using this method, the body will automatically slide along the surface of a colliding object. In addition, sliding collisions will allow you to detect the orientation
page 105:

page 109:
- In the menu, choose Debug > Visible Collision Shapes. This is a useful debug setting that will draw the collision shapes while the game is running. You can turn it on whenever you need to test or troubleshoot collisions.
page 129:
-
Do the same with the score_changed signal of the Level node, connecting it to the HUD’s update_score() method.
-
Note that if you don’t want to use the scene tree to connect the signals, or if you find the signal connection window confusing or difficult to use, you can accomplish the same thing in your script by adding these lines to the _ready() function of level.gd:
$Player.life_changed.connect($CanvasLayer/HUD.update_life)
score_changed.connect($CanvasLayer/HUD.update_score)
page 141:
Tweens
var tween = create_tween().set_process_mode(Tween.TWEEN_PROCESS_PHYSICS)
tween.set_loops().set_parallel(false)
tween.tween_property($TileMap, "position", offset, duration / 2.0).from_current()
tween.tween_property($TileMap, "position", Vector2.ZERO, duration / 2.0)
set_loops()tells tween to repeat once finished.
• set_parallel(false) tells tween to perform the two property tweens
sequentially rather than at the same time.
- You can also experiment with other tween curves. Adding
tween.set_trans(Tween. TRANS_SINE), for example, will make the platform slow down at the ends of the movement for a more natural look. Try experimenting with the other transition types.
· Chapter 05 - 3D Minigolf: Dive into 3D by Building a Minigolf Course
page 149:
- The recommended (mesh) format is
.gltf. It has the most features and is very well supported in Godot.
page 169:
-
You may have noticed that as you’re moving the mouse, it can leave the game window, and when you click, you don’t interact with the game anymore. Most 3D games solve this problem by capturing the mouse – locking the mouse to the window. When you do this, you also need to give the player a way to free the mouse so that they can close the program or click on other windows, and a way to re-capture it to come back to the game.
-
For this game, you’ll capture the mouse at first, and then if the player presses Esc, free it and pause the game. Clicking in the game window will un-pause and resume.
-
All of this functionality is controlled through the Input.mouse_mode property. Then, mouse_mode can be set to one of the following values:
• MOUSE_MODE_VISIBLE: This is the default mode. The mouse is visible and free to move in and out of the window.
• MOUSE_MODE_HIDDEN: The mouse cursor is hidden.
• MOUSE_MODE_CAPTURED: The mouse is hidden and its position is locked to the window.
• MOUSE_MODE_CONFINED: The mouse is visible, but confined to the window.
· Chapter 06 - Infinite Flyer
page 183:
func get_input(delta):
    pitch_input = Input.get_axis("pitch_down", "pitch_up")
    roll_input = Input.get_axis("roll_left", "roll_right")
- The Input.get_axis() function returns a value between -1 and 1 based on the two inputs. When using keys, which can only be pressed or not pressed, that will mean you’ll only get -1 when one key is pressed, 1 for the other, and 0 when neither or both are pressed. However, when using an analog input such as a joystick axis, you can get the full range of values.
page 204:
-
You’ll notice that the path for the save file doesn’t begin with res:// like all of the other files you’ve been working with. The res:// designation represents your game’s project folder – the place where all the scripts, scenes, and assets are located. When you export your game, though, that folder becomes read-only. To store persistent data, you use a location on the device that’s set aside for the game to write to: user://. Where this folder is actually located depends on the operating system you’re using. For example, in Windows, it would be %APPDATA%\Godot\app_userdata[project_name].
-
You can find the paths for other supported operating systems here:
https://docs.godotengine.org/en/stable/tutorials/io/data_paths.html
· Chapter 07 - Next Steps and Additional Resources
page 211:
-
[[Blender]]
-
The most common workflow is to export glTF files from Blender and import them into Godot. This is a stable and reliable workflow and will work well in most situations.
-
When you export a glTF file, you have two options: glTF binary (.glb) and glTF text (.gltf). The binary version is more compact and is therefore the preferred format, but either will work fine.
-
It’s common to import meshes from Blender and then make modifications such as adding collisions or removing unneeded nodes. To simplify this, you can add suffixes to the names of your objects to give Godot a hint about how you want them to be processed on import. Here are some examples:
• -noimp – These objects will be removed from the imported scene.
• -col, -convcol, -colonly – These options tell Godot to make a collision shape from
the named mesh. The first two options make a child triangle mesh or convex polygon shape,
respectively. The -colonly option will remove the mesh entirely and replace it with a
StaticBody3D collision.
-rigid– This object will be imported as a RigidBody3D.
• -loop – Blender animations with this suffix will be imported with the loop
option enabled.
page 212:
-
With Godot 4, you have an additional option: importing .blend files directly into your Godot project. In order to use this feature, you need to have Blender installed on the same computer you’re using for Godot.
-
To set it up, open Editor Settings and look under FileSystem | Import. Here, you can set the path where you’ve installed Blender.

- Click the folder icon to browse to your Blender location. Once you’ve set this value, you can drop your .blend files directly into your Godot project folder. This can make prototyping and iterating your designs much faster. You can open Blender, save a change to the design, and then when you tab back to Godot, you’ll instantly see it updated.